Showing posts with label capsicum. Show all posts

Saturday, August 5, 2017

Easy Tofu & Capsicum Bake

I know it's much cheaper to buy capsicum's by the kilo than it is to buy the traffic light set...... but sometimes I just can't resist the pretty colours all together in a little baggie! I find that each colour capsicum also had a slightly different taste. My favourite is red! 

Here's a recipe that's super easy. It would make an easy dinner if you just add some brown rice or other grain, or you can always add it on the side of something fancy too.


 EASY TOFU & CAPSICUM BAKE
(Serves 4)

         You'll need:
               400g packet of firm/hard tofu
               1 red capsicum

               1 green capsicum
               1 yellow capsicum
               1 large brown onion
               1 large garlic clove
               1/4 cup tomato paste
               1 teaspoon paprika
               1 teaspoon oregano 

Chop the tofu into bite size cubes. Chop the onions into half rings, and slice the capsicum into chunky pieces. Combine in a large baking dish. Add a few tablespoons of water to the bottom of the baking pan, this helps it not to stick. Grate the garlic over the top. Add the tomato paste, paprika, and oregano. Stir until well combined and the tomato paste has lightly covered the veggies and tofu. Add a 1/4 cup to the bottom of the baking pan. 
Bake in a preheated oven at 180°C for 25-30 mins until the veggies are tender and the tofu is firm and nearly crispy.


QUESTION OF THE DAY:
Which colour capsicum do you prefer the taste of?


Saturday, July 25, 2015

Kale, Quinoa & Falafel Salad

Have you seen mini kale in your supermarket or farmers market lately?
I have found these little kales in Coles, and not only are they super cute, but they are really delicious too. 
They don't have the same grassy taste that regular kale does. They have a subtle sweetness to them.
We have been enjoying them the last few months.


They are called "kalettes" and Coles has described them as a combination of kale and brussels sprouts with a nutty flavour.

I think that is a very good description.

Here's a quick and easy way to add them to a eye-pleasing salad:


KALE, QUINOA & FALAFEL SALAD
You'll need:
1 cup quinoa
1 punnet of kalettes
Approx 20 pre-cooked falafels
1 red capsicum


Dressing:

1 can chickpeas, drained
1 Tablespoon sweet chili sauce
2 Tablespoons soft tofu
1 teaspoon lemon juice

Place the quinoa in a microwave safe dish with 2 cups of water. Place a lid on and cook in the microwave for 12 minutes or until quinoa is clear and cooked through.
Allow to cool slightly.
Remove the woody ends from the kalettes and steam for 3-4 minutes.
Slice the capsicum.
Combine all the above in a salad bowl along with the falafels.
You can make your own falafels, or use packet ones. (Click on this link to see my preferred packet brand.)
To make the dressing, simply combine all the ingredients in a blender with 2-3 Tablespoons of water and blend til smooth. You can add more water if you prefer a thinner sauce.
Pour over the salad.

Can be served warm or cold.

*You can use regular kale if you can't find kalettes. Just steam and chop into rough pieces.


Question of the day:
Have you seen kalettes in the shop?

Tuesday, June 2, 2015

Cheesy Baked Cauli & Capsicum

I am totally in love with these mini capsicums that are readily available in the grocery store lately.
There's something about the mixture of the colours and their little cone shapes that I just find incredibly appealing!

Here's our families favourite way of using them lately. This makes a great side dish. 
The capsicums make little cups that hold the cheese sauce - just delicious :-)

CHEESY BAKED CAULI & CAPSICUM

You'll need:
250g tub of mini capsicums
1/2 head cauliflower
1/4 cup nutritional yeast 
1 Tablespoon cornflour
2 teaspoons onion flakes
1/2 teaspoon each sage, garlic powder, paprika
1/2 cup motherless milk of choice
1/4 cup water

Half the capsicums and scrape out the seeds. Place in a baking dish along with the cauliflower broken into florets. 

In a microwavable measuring jug, combine the remaining ingredients and stir with a fork until dissolved. 
Microwave for 1 minute until the mixture starts to thicken.

Pour over the vegetables.

Place in a preheated 200C oven for 40 minutes until veggies have softened and lightly browned.


The top will be crisp and underneath will be filled with oozing-gooey-cheesy sauce :-)


Question of the day:
Are mini capsicums available in your area?
Do you use them as mini scoops for anything?

Friday, April 17, 2015

Refried Bean Dip with Corn Crisps

Brace yourself --> I bring you fabulous news!!!
It is possible to make delicious Corn Chips that haven't been deep fried!

Here's how:

Layer half a can of creamed corn onto a lined dehydrator tray.
(You can use as many cans and trays as you like.)

Dehydrate for 8-10 hours, time will vary depending on your dehydrator. You can tell when it is done as the colour will have changed completely and the corn will be crisp.
Note: You can stir into the corn some paprika or taco flavoured spices if you desire.


 Gently pull the lining away from the corn crisps, being careful not to split them.

Using a large knife, slice into pieces (or you can do it with your hands if you'd rather!).

Serve! 
Yes, it's really that simple!  
The hardest part is waiting for the dehydrator whilst a delicious aroma fills your home!

Now for a perfectly paired dip.


Mix a can of re-fried beans with 1/4 cup diced tomatoes (either canned or freshly chopped). Stir until the re-fried beans are now more spreadable.
Pour bean mix into a serving container.
Chop 1/2 red capsicum into little pieces, sprinkle over the top of the dip along with 1/2 can drained corn kernels and 1 chopped spring onion. You can put a dollop of salsa in the middle if you like for presentation purposes.


Would you like an invite to our home for pre-dinner snacks???

Monday, November 3, 2014

In My Kitchen November: Polenta Crusted Adzuki bean & Vegetable Loaf

This month In My Kitchen I'm sharing a few newish gadgets that bring me much delight, and a recipe I've created using them. 

Let me introduce to you my new Tupperware gadget - 
I debated long & hard about if I should get one of these as they are a little pricey. In the end, I have decided it has been so so worth the money! It is incredibly versatile, works just as well as my electric food processor and yet runs just on my arm strength!!!! ;-) Gotta love anything that is environmentally friendly and helps with jiggly arm syndrome!
It has a great capacity, but at the same time doesn't take up much cupboard space (considerable less space than a traditional food processor). It is incredibly easy to clean and all the attachments store inside the compartment itself.
I use it for so many things, but it especially comes in handy for when I want to add vegetables to dishes where I don't want them to be chunky.


Let me also introduce to you my new electrical gadget - 
I never had much luck with the stove top pressure cooker that I had - so I offloaded it and waited for a good special on an electric one. I was over the moon when Target had a massive homewares clearance and this was less than half price. I quickly informed my husband that it was to be part of my birthday present! Thankfully, he took the hint!!!!
I am REALLY REALLY happy with it's pressure cooking ability. Not only for making legumes from dried instead of relying on canned ones, but also for making soups, stews, as well as cooking rice and other grains.
I LOVE the saute function, as it means I can toss in my onions and garlic and saute them in the same pot before adding other ingredients, saying on washing up. 

The non-stick coating is fantastic meaning I can saute without using oil, and also the insert goes into the dishwasher - a MUST for all our cooking gadgets as I hate washing up!!!!
It is *meant* to be multi-function meaning it can slow cook also, however after several trys with the slow cook feature on maximum length I have been disappointed to find the meal virtually uncooked. So, alas I haven't as yet been able to offload my other slow cooker as I was hoping to with a multi-purpose machine. Though, I find that with this machine I have no real use for a slow cooker as I can pop this on anytime and the keep warm function works amazing. Also everything that I previously would of done in the slow cooker has worked fantastically well being pressure cooked.


And now let me show you a recipe I made using both of these new gadgets:

POLENTA CRUSTED ADZUKI BEAN 
AND VEGETABLE LOAF 

Loaf:
1 onion
3 garlic cloves
1 carrot
1/2 head broccoli
2 celery stalks
1/2 capsicum
2 cups cooked adzuki beans
1 teaspoon each: dried oregano, cumin, turmeric, paprika
1/2 cup tomato paste
Topping:
2 Tablespoons nutritional yeast
1/3 cup polenta
1/3 cup panko breadcrumbs (regular breadcrumbs work fine however I particularly like the added crispiness that panko crumbs provide)


Place all the vegetables roughly chopped into a chopper, or food processor.
Process until all ingredients are finely chopped. (You can do this by hand if you would rather, for the best outcome you need all ingredients very finely chopped.)
In a large bowl, lightly mash the adzuki beans (I used the back of a spoon, depending on how soft your beans are you may need a proper masher) and stir in all the herbs and the tomato paste. 
Add the vegetables to the bowl and stir until well combined.
Press the mixture into a large baking dish (I used a 30cm x 20cm). Press down well.
In a smaller bowl combine the ingredients for the topping/crust. Press the crust over the bean mixture and gently press down. (For a gluten free version replace the breadcrumbs with more polenta.)
Bake in a preheated oven for 35-40minutes until golden brown on top.


Slice and serve.
Delicious with roasted potatoes (as I had but somehow managed to delete the picture)!
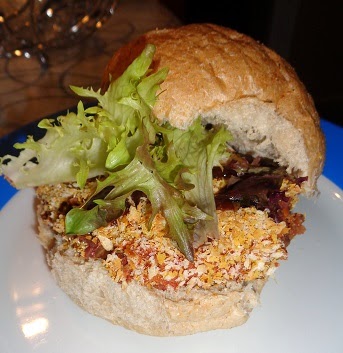
My hubby and daughter love this in a burger!

(Note: I have made this several times and I usually include frozen spinach that has been defrosted prior to adding it to the vegetable mix - however on the occasion I was taking pictures I defrosted the spinach and then forgot to stir it in!)


Share what's in your kitchen at Fig Jam and Lime Cordial.

Question of the day:
Have you ever debated about purchasing a kitchen gadget and had it work out more valuable than you initially thought?

Friday, October 31, 2014

Quinoa Stuffed Eggplants


Here's another post that has sat in my drafts for sometime.
I had taken several photos and for some reason my SD card in my camera decided it would corrupt the pictures. Not happy!
I have since upgraded my SD card and now I bring you these super yummy 


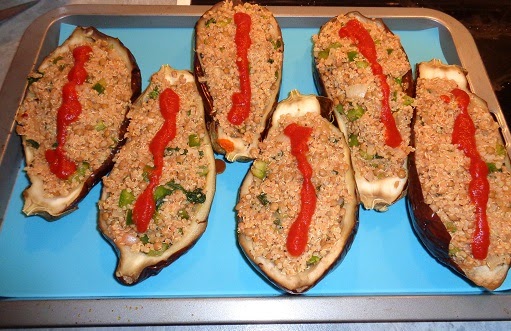
Quinoa Stuffed Eggplants
(Makes 6)
You'll need:
3 large eggplants
2 cubes frozen spinach
1 onion
2 cloves garlic
1/2 green capsicum
1 tin lentils
1 Tablespoon mixed Italian herbs
2 cups cooked quinoa
2 Tablespoons nutritional yeast
1/2 cup tomato passata cooking sauce

Bake the eggplants in a preheated 200C oven for 30 minutes until softened. Make sure you have pierced the flesh in several places with a fork so they don't explode. 

Cut the eggplants in half lengthways, and scoop out the softened flesh, leaving a small border (approx 1cm) around the edge of the eggplant.
Lay them out on a baking tray.

Soak the frozen spinach in some boiling water for a few minutes until defrosted. Drain. (Omit if using fresh spinach.)
Chop the onion, garlic, and capsicum.
Stir all the vegetables in a large bowl and combine with the drained lentils, nutritional yeast, herbs, quinoa and passata.  Chop the flesh of the eggplant that was removed and stir this into the mixture too (optional - it also makes a great dip if you don't want to add it to this mixture!).
Scoop the mixture into the cooked eggplants. Fill them quite well as this will give the eggplant case back its shape. Press the mixture down quite firmly. 
Drizzle a line of passata over the quinoa mixture (this is purely for presentation purposes, cause I think it looks better than just the plain mixture, salsa also works fantastic or any other sauce you'd rather).
Reduce the oven temperature to 180C and bake the eggplants, now stuffed, for a further 20 minutes until warmed through completely.

A recommendation and a story:
My husband took one bite into these & spat it out, declaring how awful they were!!!
I was chuckling to myself because I realised he had eaten the top of the eggplant! I thought everyone knew you weren't supposed to eat the top of eggplants - clearly not!
So I highly recommend removing the eggplant tops prior to putting these on plates.
After his initial opinion of this meal, he decided they were actually quite delicious!


Submitted for Healthy Vegan Fridays.

Add your recipe at:
Rock My Vegan Socks 
Vegan Dollhouse 


Question of the day:
Have you ever accidently eaten the top of an eggplant?

Friday, October 17, 2014

Kids Lunchbox Club - Quick Mexican Quinoa Salad

My daughter has decided that she quite loves quinoa! This is thanks to her testing out a Dreena Burton recipe. So this means now she requests it for her lunchbox salad. We don't often eat quinoa, but I had a batch made up this week and with a few leftover bits and pieces from a Mexican-inspired meal we had prepared earlier in the week this delicious salad was created.
Nevermind the kids! I reckon this lunchbox meal would please any adult too!

QUICK MEXICAN QUINOA SALAD

To serve one you'll need:
1 cup cooked quinoa
2 Tablespoons of salsa
1/4 cup black beans
1/4 cup corn kernels
1/4 small capsicum - chopped
1/2 small avocado - diced

Stir a tablespoon of salsa into the quinoa and mix well. 
Add the other ingredients and stir through. Top with the remaining tablespoon of salsa.


Submitted to Healthy Vegan Fridays
You can add your recipe on these blogs:
Vegan Dollhouse 

Rock My Vegan Socks

Monday, August 18, 2014

Slow-cooked Mexican Stew

Monday nights are slow-cooker night in our home.
I must admit that for the first few years of owning a slow cooker I used it for nothing other than soup.
I am discovering that there is so much more than just soup that can be done in the slow cooker. I regularly make dried beans and love that on the high function it takes only 2-3 hours to cook them from scratch, even without pre-soaking if I haven't had the chance to do that.

Here's a way I make a complete meal that isn't soup:

SLOW-COOKED MEXICAN STEW

You'll need:
1 cup brown rice
1 can black beans
1 can red kidney beans
1 onion
1 green capsicum
1 cup frozen corn kernels
1 can tomatoes
2 cups vegetable stock
2 garlic cloves
1 teaspoon taco spice mix of choice

Chop all the vegetables and drain the beans.
Add all ingredients to slow cooker. 
If you have the option, saute the onion & garlic first. If not, don't worry because it will still work out and be delicious.
Cook on slow for 6-8 hours.

Serve.

The rice will fluff up to be lovely & thick. It will absorb all the liquid so that this isn't the consistency of a soup.


Thursday, July 10, 2014

Warm Bean Salad

Winter is well and truly upon us now, so warmer salads are appealing to me more than cold ones! To be honest I'm not one who enjoys plain boring salads, I like salads with lots of flavours and substance! 

The aroma while this is cooking is just divine...
And is there anything so beautiful as the colours of plant foods?

You'll need:
1 small onion
2 cloves garlic
1 can each red kidney beans, butter beans
1/2 cup frozen corn kernels
1/2 green capsicum
1/2 small celery stalk
6 cherry tomatoes
1/2 teaspoon dried oregano
small handful each fresh basil leaves, fresh parsley
fat free Italian dressing
salad leaves of choice

Chop the onion (I did half in slices and half in little pieces just to be a bit different for a salad!). In a large frying pan saute the onion with the crushed garlic in a little bit of veggie stock. When the onions start to brown add the drained legumes, the corn, the chopped capsicum & celery. 
Fry for approx 5-7 minutes, stirring frequently until the veggies are lightly cooked. Quarter the tomatoes and add them to the fry pan. Sprinkle over the chopped fresh herbs and drizzle the Italian dressing over. Continue to cook for as long til the veggies are as soft as you desire. 
Serve over salad leaves. I used a combination of cos, iceberg & a bag of mixed leaves.


Question of the day:
Do you eat salad in winter, or only in the warmer months?

Monday, June 2, 2014

Slow Cooked Ratatouille with Sweet Potato and Butter Beans


I love ratatouille.... however without any starch I find it doesn't keep me full for very long.
The addition of the beans & sweet potato make this a complete meal.

And using the slow cooker means after a busy day we can come home to a complete meal all ready without having to add anything on the side.

Slow Cooked Ratatouille
1 onion
1 sweet potato
1 eggplant
1 capsicum
1 zucchini
3 cloves garlic, crushed
1 can butter beans, drained
1 teaspoons each dried thyme, basil, oregano, rosemary & marjoram
800g can diced tomatoes

Chop all the vegetables into reasonably sized chunks.
Add all the ingredients in a slow cooker & fill with enough water to cover (approx 1-2 cups).
Cook on high for 4 hours, or low for 8 hours.


I'm such a fan of simple meals like this! Easy doesn't have to compromise taste! 
 
Question of the day:
Are there any meals that are traditionally cooked in the oven that you've tried in a the slow-cooker?

Friday, May 16, 2014

Baked Quinoa Pizza Pie

This is neither a pizza nor a pie really..... but rather inspired by both pizza and pie!
Either way - it's totally delicious :-)


BAKED QUINOA PIZZA PIE
Pie:
3 cups cooked quinoa
1/2 green capsicum
1/4 cup corn kernels (or other pizza veggies of choice like mushrooms)
1 spring onion
1/4 cup fresh basil leaves
1/4 cup nutritional yeast
1/4 cup tomato paste 1 teaspoon garlic flakes
1 teaspoon dried oregano
1 teaspoon chili

Chop the veggies and basil leaves.
Place all the ingredients in a bowl and stir until well combined.
Press into a lightly sprayed casserole dish. Press down well.

Next make the topping.

Cheese sauce:
2 generous Tablespoons nutritional yeast
1 Tablespoon cornflour
1 cup plant milk of choice

Whisk together all the ingredients in a microwave safe jug.
Microwave for 1 minute or until thicken.
Spread over quinoa mixture.


Bake 30 minutes in a preheated 180C oven.

Slice and serve.
This will slice better if it has had time to cool first. 

 Submitted for Healthy Vegan Fridays.

Add your healthy vegan recipe on these blogs:

Herbivore Triathlete 
Hello Veggy 
Rock My Vegan Socks


Question of the day:
What dishes have inspired you to be creative with their flavours but in an alternate way?

Wednesday, April 30, 2014

WIAW - Last day of April

Can you believe it's the last day of April already?
Where on earth has this year gone???
Here's what I ate today:
Breakfast was a bowl of granola - This week I made a batch using this recipe from PlantPlate
Lunch was my fairly regularly eaten hummus pizza.

And dinner was this absolutely delicious & super easy


Lentil & Green Vegetable Dish
(Makes 6 servings)
You'll need:
1 cup green lentils
2 bay leaves
1 onion, chopped
2 cloves garlic
2 zucchinis, chopped
1 green capsicum, chopped
1 400g can tomatoes
2 cups stock1 Tablespoon tomato paste
1 teaspoon mixed Italian herbs

Put the lentils in a pot with 2 cups water and the bay leaves, bring to the boil and simmer for 25-30 minutes until the lentils are soft.
Drain and rinse.
In a large frying pan water saute the onions til soft and then add the crushed garlic cloves.
Stir in the other chopped vegetables and saute til slightly tender. 
Add the tomatoes, lentils, stock, tomato paste & herbs. Stir until well combined.Cover and let cook for 10 minutes until all is warmed through.
Remove bay leaves prior to serving.
Serve over a wholegrain of choice.
  Shown here served with a 1/2 fresh corn cob and farro.


This was the first time I have ever cooked farro. 
It was very chewy and I'm not sure if that is how it is or if I had just undercooked it - I'm about to go and research to find out!

Question of the day:
Have you tried any new grains lately?

Tuesday, February 25, 2014

Simple Green Split Pea Stew

For those nights when we need instant meals and we have the morning to prepare, I find the slow cooker is just so handy! 
This meal is so tasty and yet it's as simple as chopping and letting the slow cooker do the rest of the job for you.
 

Don't own a slow cooker - you can also make it over a stove top if you prefer - just bring all the ingredients to a boil and then simmer for 40 minutes.

SIMPLE GREEN SPLIT PEA STEW
Serves 4

1 cup green split peas - (if you have time soak overnight in 2 cups boiling water)
1 onion
2 garlic cloves
2 bay leaves
2 teaspoons dried oregano
2 teaspoons chili (optional- adjust as desired)
1 zucchini
1 carrot
1/2 large green capsicum
1 can tomatoes
1 can baby potatoes
2 cups veggie stock (either store bought or home-made

Chop all the vegetables to your desired size.
Place all ingredients in a slow cooker and leave for 6-8 hours until everything has softened.
Remove bay leaves prior to serving.


Serve with warm bread of choice.

Question of the day?
Do you enjoy using a slow cooker?

Friday, November 22, 2013

Veggie & Rice Bake with Cauli-Sauce Topping

This bake has a lot of layers & takes a bit of time, but its not at all hard.
In fact once the layers are put together it simply bakes in the oven.

We have had this many times and its always a winner. I love how big the meal is so that makes plenty of leftovers!
Its incredibly tasty & although it's just 'one' dish, it really is a complete meal by itself.
I especially love the cauli-sauce topping because I can't get my husband to eat cauliflower unless its hidden like this!!!! ;-)

VEGGIE & RICE BAKE WITH CAULI-SAUCE TOPPING

Makes one large baking tray - Serves 6-8
You'll need:
Bottom layer: 

2-3 cups cooked brown rice
1 can lentils, salt free
1 onion
1 cup mushrooms
1 can tomatoes

1/2 green capsicum
1 can corn
1 carrot

Cauli sauce:
1/2 head of cauliflower
2 Tablespoons tahini
1/3 cup nutritional yeast
1/2 cup milk
1/2 cup water
1 teaspoons minced garlic

Black pepper

Spread the pre-cooked brown rice into the bottom of a large baking dish.
Drain the lentils and spread the evenly over the rice, followed by the chopped onion & the chopped mushrooms. (Mushrooms shown only on one side of the bake here to keep hubby happy!)
Pour the canned tomatoes over the onions and mushrooms. Spread so evenly distributed.


I find the putting the tomato in the middle helps to keep the bake moist while its cooking instead of just on the top.


Chop the carrot & capsicum. Spread them over the tomatoes along with the drained corn.
To make the cauli-sauce:
Combine all the ingredients in a blender and blend til smooth and thick.


Pour the sauce over the bake and spread til all the veggies are completely covered.

 Sprinkle with freshly cracked black pepper.
Bake in a preheated 200C oven for  45-60 minutes. The vegetables will be tender but not completely soft after 45 minutes, they will be soft by 60 minutes - so the choice is yours! Please note, these times are for my oven and ovens can vary! Baking for 60 minutes will definitely brown your cauli-sauce but not to the point of being burnt. If you are worried about the browning you can cover the dish with foil.
Shown here baked for 1 hour.
So I must admit that this is not the 'prettiest' food to photograph! The pictures don't do it justice of how yummy it is! 
Definitely a home-style meal & not for photographic purposes!!!!


Submitted for Healthy Vegan Friday.
You can add your recipe at these blogs:
carrie on vegan