Showing posts with label treats. Show all posts

Monday, October 26, 2015

Thanksgiving Recipe - Pumpkin Pie

It's about this time of year when many people start thinking about thanksgiving.
We don't celebrate thanksgiving, but I previously tried this recipe for a dinner party with friends and it worked so well that I wanted to try it again and make sure I posted it in time for thanksgiving if it worked out.
I'm pleased to say that it works so well and is totally delicious :-)
It's not very difficult to make either which means it's a winner in my books! 


EASY PUMPKIN PIE
(This recipe makes 1x 24cm pie - serves 8-12 depending on cutting size.)
You'll need:
For the crust:
1 1/2 cups rolled oats
1/2 cup unsweetened applesauce
1 teaspoon vanilla essence (optional, works without it)
For the filling:
1/4 medium size pumpkin
300g tub soft silken tofu
1/4 cup maple syrup
1 teaspoon vanilla essence
2 teaspoons pumpkin pie spice (don't have this - use 1t cinnamon, 1/4t each ginger, nutmeg, allspice and cloves)

Peel and de-seed the pumpkin. Cut into pieces and cook until tender however you choose, my preferred way is in the microwave. This takes approx 7 mins with a small amount of water in the bottom of a microwave safe dish. You need 1 1/2 cups of cooked pumpkin pieces, though don't stress if you are a little over or under as this recipe is very forgiving.
Set cooked pumpkin aside.
In a food processor combine the crust ingredients and pulse until the mixture is lightly crumbled and comes together.
Press the mixture into the pie dish with the back of a spoon. You can be as precise or rustic as you desire. Make sure there are no holes in the button layer as the filling will leak through if there is.
Place pie base in a preheated 160°C oven and baked for 20 minutes. 
In the meantime, prepare the filling.
Make sure the pumpkin is well strained of any water. Strain the tofu.
Combine all the filling ingredients in a food processor and blend until very smooth.
Pour the filling over the baked pie base.
Spread with the back of a spoon to get a nice even surface on top.
Return to the oven and bake for a further 40 minutes, still at 160°c.
Once cooker, remove from the oven and allow to cool completely before slicing.


Note: 
* We have found that so long as we are using a glass pie dish it doesn't need to be sprayed with oil, the pie slides right off it when it's cooled.
* This is a lightly sweetened pie, you can use more maple syrup if you'd like a sweeter pie.


Question of the day:
Do you celebrate thanksgiving?

Sunday, January 25, 2015

Easy Choc-Mint Biscuits

Happy Australia Day to all my Aussie readers.
I hope you are enjoying your long weekend. 

If you haven't found something amazing to make tomorrow then let me suggest these!
Lots of people think of Tim Tam's and Mint Slice as real 'Aussie' biscuits.
And yes, there are vegan versions available in the supermarket - but hey, why not make your own??!!

I don't pretend these are healthy, but then again, we're all allowed a treat occasionally.


EASY CHOC-MINT BISCUITS

You'll need:
Arnotts nice biscuits
Kingland Soy cream cheese
Your Inspiration at Home choc-mint powder (or alternatively cocoa powder with a drop of peppermint essence)
Lindt 70% dark chocolate block

Remove the creamcheese from the fridge and allow to soften for 10 minutes. Mix in the choc-mint powder (or cocoa and mint essence).
Spread the mixture over the top of nice biscuits. 
Melt the dark chocolate in a microwave on 50% power until soft and runny. Drizzle over the biscuits. 
Allow to cool before serving so the chocolate can set. 
You can keep these in the fridge to firm up for about half an hour. Any longer and the biscuits will go soggy!

Enjoy! :-)


Saturday, March 31, 2012

Pina Colada Doughnuts

Ok so these are actually kid friendly as they don't really have rum in them! Though I'm sure you could add some for an adult treat!  The term "Pina Colada" is known as that marvellous taste combination of pineapple & coconut!

And yes, these are marvellous! :-)

You'll need:
A small tin of pineapple pieces
1 cup self raising flour
1/2 cup coconut
1/4 cup raw sugar
1/4 cup soymilk

Put the whole tin of pineapple pieces into a bowl and mash - Don't drain the pineapple pieces. You can mash thoroughly til little pieces are formed or you can leave bigger pieces if you prefer.
In a large bowl combine the flour, sugar & coconut. Stir well then add the mashed pineapple pieces and soymilk. Combine well but don't overmix.
Pour into a oil sprayer doughnut pan & bake at 180C for 15 minutes.

They come out a lovely golden brown colour.
These are delicious just plain like this - or else for an added little treat you can add some glaze.
The glaze is really easy - just mix 1/4 cup icing sugar with approx 2 teaspoons of water - mix well, then drizzle over the doughnuts & top with coconut shreds.

Thursday, January 27, 2011

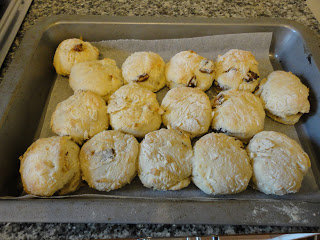
Quick & Easy Date Scones

mmmmmmmmmmmm, date scones!
These ones are so simple to make & work out so light & fluffy.

You'll need:


3 cups self-raising flour
200ml leomonade
200ml coconut cream
250g dates (fresh of dried- i prefer fresh)

  
(you can also substitute other dried fruits if you'd rather, or just make them plain)


Mix flour, lemonade & cream in a bowl. Stir gently. Chop dates into small pieces & remove pips.
Add to the bowl.
Stir gently until all combined.
Mixture will be slightly sticky but still touchable.

Turn mixture onto a floured board, or a piece of baking paper. Press down lightly with your hands til mixture is about 1 inch thick.


Using a scone cutter, or the top of a cup, cut out scones & place on a piece of baking paper.

Bake for 10-12 mins at 200C until lightly golden brown.


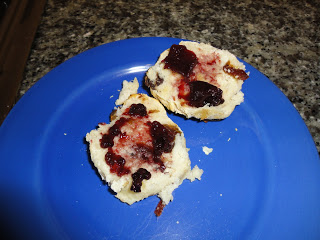
Serve with jam or by itself :-)


Sunday, January 16, 2011

Better Than Ice-cream

My favourite dessert :-)
I love black forest cake - this treat has a similar flavour but without all that fat & sugar.


Combine in a blender or food processor:
           1 frozen banana
           1 cup frozen pitted cherries
           100ml chocolate soy milk
Process until smooth.
Serve.

Makes about 2 servings

Wednesday, December 22, 2010

A FEW TASTY TREATS

This is the best banana cake recipe I've ever tried!
It was really moist & very tasty.
It has much less fat & sugar then the regular banana bread you buy from a shop so worth having it in the breadbox!!!!


 BEST BANANA CAKE
Picture: See right side of cake stand.
Ingredients:
2 large over ripe bananas - mashed well
1/2 cup maple syrup
2 tablespoons rice bran oil (any other oil is fine also)
2 teaspoons vanilla essence
2 1/4 cups wholemeal flour
1 tablespoon baking powder
1 teaspoon baking soda


Preheat oven to 180C. Line a loaf pan with baking paper.
Place flour, baking powder & soda in a bowl & stir until well combined.
Add the mashed banana, maple syrup, oil & essence. Stir until well combined. Ok if the batter is thick.
Bake for approx 30 mins until skewer comes out clean.
Cool before cutting.

Option: ICING
For an easy icing- mix in a food processor tofu, coconut, maple syrup & vanilla, blend til smooth - very tasty! Note that this icing DOES NOT keep out of the fridge. 


CHOCOLATE PLUM COOKIE CAKE
Picture: Left side of cake stand.

Ingredients:
1 cup self-raising flour
1 cup raw sugar
1 teaspoon allspice
175g nuttelex
100g almond, ground (either make your own or buy ground almondmeal)
2 teaspoons egg-replacer
1 cup dried plums
200g dark cooking chocolate

Preheat oven to 160C. Line a 20cm round baking pan with baking paper. (Or you can use a slice tin if you're rather cut it into squares later.)
Cream nuttelex & sugar together in a bowl. Beat until light and creamy. Add egg replacer & continue beating. Add sifted flour, allspice, sugar & ground almonds, a bit at a time. Mix until just combined - do not overmix.
Chop the chocolate and the plums into little bite size pieces and then fold them into the mixture.
Pour mixture into the pan you are using & bake for about one and a quarter hours until cooked.
Allow to cool. Sprinkle with cocoa powder.

This will come out quite hard & not look like a cake that has risen! Don't fear, it tastes DIVINE! The mix of chocolate & plums is magical.
It will be a bit crumbly when slicing so I don't recommend a serrated knife .
This can be sliced into pieces like a cake or into squares.


(Stand by for the recipe for the bells that you see ;-p)