Showing posts with label baking. Show all posts

Sunday, April 25, 2021

Bit-like Anzac Cookies!

Ok, I admit I should of posted this a few days ago so you could all benefit from making these delicious cookies....... but surely it clear by now that my blogging mojo left the building quite a few years ago! 
Now sadly I will admit, I have been making this new version of Anzac cookies for the last few years but never made the time to sit down and blog them! 

WELL TODAY IS YOUR LUCKY DAY! ;-) 

How did these cookies come about when I already have a recipe for Anzac Biscuits..... 
Well we haven't had coconut in the house for over 4 years now, and I eat virtually flour free so I decided to make a varied version of the one I already published all those years ago! 

Ok, I know that it's not very traditional to make Anzac cookies without coconut, but when you're limiting saturated fat this version sure gives you the mouth feel of a traditional Anzac cookie, but without the unhealthy fat. I decided to add golden syrup instead of rice malt to this recipe as I really feel like it is what truly reminds me of Anzac cookies! 


ENJOY! 

        You'll need:
        (Makes 8 thick cookies)
                1 cup rolled oats
                1 cup oatbran
                1/3 cup muscavao or brown sugar
                1/2 cup unsweetened apple sauce
                2 Tablespoons golden syrup
                1 teaspoon coconut essense
                1 teaspoon bi-carb soda
                2 Tablespoons boiling water

Combine the dry ingredients in a bowl and mix until well combined. 
Add the wet ingredients EXCEPT for the bi-carb/water but don't mix yet. 
Mix the bicarb in a small ramekin with the boiling water. When it bubbles, add it to your mixing bowl and stir all ingredients gently til well combined and the mixture holds together. 
Don't overstir.
With wet hands press the mixture into 8 cookies and bake in a preheated 180C over for 10-15 mins til desired done-ness (is that even a word?!?!!!).


I found these a little more crumbly than the original recipe, obviously the flour impacts that. I enjoy this texture more of this version and I also enjoy them a little thicker- thus why I consider them a "cookie" compared to a biscuit! I also enjoyed the golden syrup considerably more than the rice malt! 
TO be honest, I"ll never go back to making them the previous way - probably because I"ll never buy coconut again!! haha ;-) 

If you try both - let me know which version you prefer! 

Thursday, September 13, 2018

Vegan Mofo Day 13 No packing snacking!!! - Almond Mylk Pulp Crackers

Today's prompt for vegan mofo is snacks without packaging.

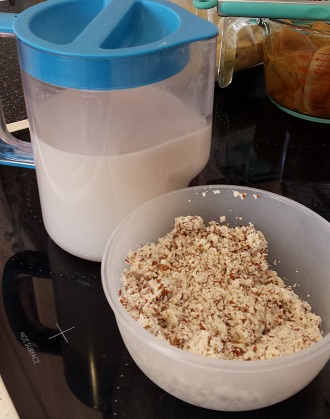
I shared on my facebook page a video of how quick & easy it is to make homemade almond mylk.
It's as simple as blending soaked almonds with water and straining the mixture! You can, of course, add any vanilla or sweeteners that you desire.
Even though this way of making almond mylk, most times, ends up less expensive than store bought versions, and without the additives that are so common in plant based mylks, the end result of making your own mylk is pulp!  
Now if you're like me, you don't want to just throw it away..... so the question remains, what to do with all the pulp! 

My daughter loves these crackers made from the almond mylk pulp!
They are easy to make and are a great snack or addition to a lunch plate.

ALMOND MYLK PULP CRACKERS

               You'll need:
                      1 batch of almond mylk pulp (about 1.5 cups)
                      1/2 cup wholemeal flour
                      2 Tablespoons ground flax seeds
                      2 Tablespoons fresh rosemary - finely chopped
                         (you can substitute other herbs if you desire)

In a mixing bowl combine all the ingredients together. 
Depending on how dry your pulp is, you may need to add 
spoonfuls of water until the mixture is just combined. 
Line a baking tray with baking paper and spread the mixture over it. 
Top with another sheet of baking paper and use a rolling pin 
to roll out the mixture until approx. 1 cm thick. 
Using a pizza cutter score the mixture.
Bake in a preheated 200°C oven for 20-25 minutes until 
crackers are crisp, golden and cooked through. 
Remove from the oven and allow to cool on the tray. 
Break apart the pieces. 


Question of the day:

Do you make your own motherless mylk?
If so, which type do you make, and how do you use up the pulp?

Wednesday, September 12, 2018

Vegan Mofo Day 12 Spicy without heat! - Mexican Baked Mushrooms


Today's mofo prompt is "Spicy without chilies".
Mexican food is often made with chilies and yet for those who don't like heat 
Mexican food also had a lot of flavour.

Here I show you how to enjoy some Mexican flavours without adding any chili..... 
and for those of you who do like heat you can always add some chili in!

This is a meal idea without exact quantities stated. The reason I do this is because I always like to encourage people to get experimental in their kitchen and enjoy the cooking process. It a wonderful way to realise that creative meals don't have to be time consuming or difficult to make. Whenever I make meals like this I make a comment to my husband "It's not that hard to make quick, easy yet enjoyable vegan meals! Why do some restaurants find it so difficult!"


MEXICAN BAKED PORTOBELLO'S

                            You'll need:
                                   Large portobello mushrooms
                                   Cooked black beans
                                   Can or tub of diced tomatoes
                                   Mexican spice mix/taco mix or
                                       - paprika, cumin, coriander & oregano

                                   Avocado
                                   And a batch of my basic cheese sauce

Remove the stems from the mushrooms.
Place them in a microwave proof container with 1cm of water and heat for 2 mins. This helps to soften them and significantly reducing oven cooking time.

In a mixing bowl combine the black beans, tomatoes and spices.
Drain the water from the mushrooms and place them in an oven proof dish.
Fill the mushrooms generously with the black bean/tomato mixture and bake in a preheated 200°C oven for 15-20 minutes until mushrooms have cooked through and the black bean mixture is hot. 


Pour a freshly made batch of cheese sauce over the top of the mushrooms 
and serve with slices of fresh avocado.


I feel like this meal looks a little fancy and if I got served this 
at a restaurant I'd be more than happy! 

What do you reckon!!! Does it look fancy enough to be a restaurant meal?

Question of the day: 
What meals do you make at home that are a little bit fancy?

Monday, September 10, 2018

Vegan Mofo Day 10 Baking without Flour - Breakfast Brownie


Today's vegan mofo prompt is "Baking without Gluten".
Whilst this recipe *may* contain gluten due to the oats, it is a flour free recipe which is something that is very relevant to me as I shared in my Introduction Post! For a guaranteed gluten free version you can substitute quinoa flakes in place of the oats.
I am quite enjoying my flour free life and with delicious breakfast treats like this, it's no wonder that I am not feeling deprived at all!
It would also make a great dessert for anyone who wants a little after dinner treat! 


Single Serve Black Bean Breakfast Brownie

                                  You'll need:
                                        1/2 cup cooked black beans
                                        1 Tablespoon ground flax seeds
                                        1/2 teaspoon cacao powder
                                        1/4 cup rolled oats
                                        1 small overripe banana
                                        1 teaspoon vanilla

Combine all the ingredients together in a mini food processor and pulse until lightly combined (best to keep some chunks for added satiety - Chew your food!). Add a splash of water if it's needed to combine the mixture into a thick batter. The water may or may not be needed depending on the size and ripeness of your banana and how well your beans are cooked.
Pour mixture into a silicone baking mould. I press my mixture into a quarter of a large square one. It doesn't spread as it cooks so this works well. Bake in a preheated 200°C oven for 20 minutes until cooked through and edges are crispy.

Delicious served with yogurt and berries.


Showing the pieces of banana and beans so you can see it's not pulsed thoroughly. 

*I find this sweet enough with just the banana, however if you'd like a sweeter version you can add 1 Tablespoon date paste to the batter.
*Multiply quantities if you want to make a multiple serves. 


Saturday, September 8, 2018

Vegan Mofo Day 8 Epic Fail Turned Inspiration - Carrot bread rolls


Today's mofo prompt is to use our own flops from the past to improve! 
Well that could be a general life lesson really and not just applicable to cooking!!!!

I have always wanted to be able to bake bread well but never really known how and so I have been on a mission the last few years to work out how to make nice homemade bread that is 100% wholemeal and oil free, of course. I am noticing that more oil free options are slowly becoming available when it comes to bread and bread products in the stores, but sadly even when they are 'wholemeal' the % of wholemeal flour used is usually pitifully low. So I have experimented quite a bit the last few years and feel reasonably confident in my bread-making abilities now after many ~many~ flops!!!
And whilst I don't eat flour myself anymore, my family love it when they get fresh homemade bread. 


100% Wholemeal Carrot Bread Rolls
Makes 8 rolls

                              You'll need:
                                      600g wholemeal bakers flour

                                      2 teaspoons yeast
                                      1 teaspoon bread improver
                                      450ml warm water
                                      2 medium carrots

Directions:

Shred the carrots using either a grater or food processor. In a large mixing bowl place all the ingredients together and mix until well combined. Once everyting is mixed in, transfer the dough to a lightly floured tray and knead for 10 mins til elastic. Return the dough to your mixing bowl and let dough rise for an hour in a warm place. I recommend heating your oven on low while you are kneading, and then turning it off and putting the dough in there.
Once risen, split into 8 portions and roll each portion into a bun shape.
Evenly space your rolls on a baking tray and bake at 180°C for about 25 mins until golden brown and cooked through. 


Super light and fluffy rolls with a bit of crunch from the carrot 
and no unnecessary ingredients!

Question of the day:
What kitchen flops have you had in the past? 
Is there anything you want to learn how to cook better?


Thursday, September 6, 2018

Vegan Mofo Day 6 Anti-vegan Inspired - Tofu Pizza Bites


Today's vegan mofo prompt is "The Anti-Vegan"! 

Whilst I don't think that I'd win anyone for the vegan cause saying 
"tofu really can taste delicious", the simple fact of the matter is that it CAN!

So with that in mind, I used tofu to inspire my dish for today.
Most people who don't eat tofu regularly think that it's awful - 
yet how many of them have actually tried good tofu I wonder?!?!?

I have discovered that tofu can either be completely revolting, 
or totally lip smacking depending on how it's cooked and flavoured.

Different types of tofu work in different ways too and learning how each of them work and what they are best suited for is a HUGE contributing factor to how well your tofu will turn out! But explaining the different types is a long post for another day.

I remember discovering baked tofu and how different it turned out from 
cooking it in a pan! It really took my love of tofu to a whole new level! 
I love experimenting with various forms of baked tofu now!

Today - I'm hoping to inspire your tofu taste buds with this simple recipe idea!
I won't specify amounts as pizza toppings can be quite a personal preference ;-) 


TOFU PIZZA BITES

                         
                               You'll need:
                                     Firm/hard tofu (NOT silken)
                                     Tomato paste
                                     Italian herb mix
                                     Nutritional Yeast

                    Drain the tofu and press out any excess liquid by gently 
                    placing a chopping board over the tofu and pressing down 
                    lightly. You don't have to get out all the liquid so don't 
                    stress over getting the tofu perfectly dry. 
                    Slice the tofu into approx. 1cm thick pieces. 
                    Spread with the tomato paste, a sprinkle of herbs and 
                    top with nutritional yeast. 
                    Bake in a preheated 200°C for 20 minutes or 
                    until cooked as you desire.

Feel free to add veggies to your pizza bites if you want to! 

So delicious!!!! 

Question of the day:
What's your favourite way to cook/prepare tofu?

Monday, September 3, 2018

Vegan Mofo Day 3 Person Inspired - Chocolate Pear Bake


Following along the list of themes and prompts for vegan mofo.....

                 Today's inspiration is bought to you by a person!

I had to think about this one as I don't know that I am hugely inspired by other people as I do quite like to be my own person but then this idea came to mind! 
Now I must say that this recipe has been sitting in my 'drafts' since June 2015!!!! (OPPS! Just goes to show my lack of blogging lately!)
It's original inspiration came from Nigella Lawson! I used to LOVE watching her cooking shows and I recall one time her commenting how well pear and chocolate go together. I have to admit that I've never actually tried any of her recipes, nor do I recall the recipe she made to make that comment!! But I did keep in mind this flavour combo and started to experiment with this combo of flavours, and yes, I can say that indeed pears & chocolate do go incredibly well together!!!

Here's my take on a delicious, yet healthier version of pears and chocolate combined!
Using overripe pears in this recipe means you can use far less sugar than in traditional baked desserts as they are naturally more sweet. If you don't have overripe ones, that's fine too, under-ripe ones will work quite well and will soften as the dish is baked. This is a great way to use up any spare pears you may have if you've stocked up when they're on super special (speaking from experience)!! 

CHOCOLATE PEAR BAKE
(Makes 1 cake that serves 6-8)
                  
                    You'll need:

                   3 overripe pears
                   1 cup wholemeal flour
                   1 teaspoon baking powder
                   2 Tablespoons coconut sugar
                   1/4 cup cocoa powder
                   1/2 teaspoon cinnamon
                   1 teaspoon vanilla
                   1 cup motherless milk of choice

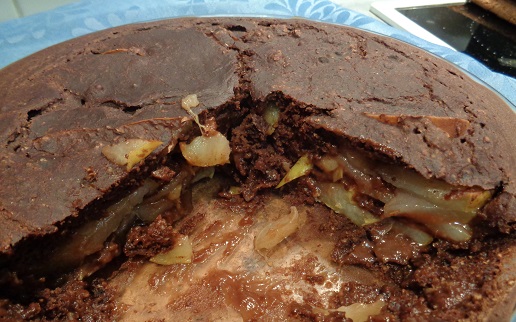
Slice the pears into thin pieces and remove any of the core. Layer in a 24cm pie dish with the large side out and the small ends meeting in the middle as shown below. 

In a mixing bowl combine the flour, baking powder, sugar, cocoa powder, cinnamon, vanilla and milk. Mix together til just combined using a whisk. Do not over stir as the mixture will then become too chewy as it bakes. Pour the batter over the pears.

Place dish in a preheated 180°C oven and bake for 40 minutes.  
 Slice and serve.
I find using a glass pie dish that it doesn't stick and can be served easily enough, however if using a ceramic or other dish, I would recommend lining it first with non-stick paper. 


If you wish to try a completely sugar-free version I reckon you could substitute the coconut sugar for 1/4 cup of date spread without it hugely affecting the way this bake turns out. 
I haven't tried it in this exact recipe but with my largely sugar free home these days that is what I would try! If you do give this version a shot - be sure to let me know what you think :-) 


Wednesday, September 27, 2017

No Junk Muesli Bars


When it comes to muesli bars, the ones in the shops are usually so full of junk! But sadly even many homemade recipes use oils or sweeteners in excessive amounts too. Here's a great recipe that has no junk and is still quick & easy to make! You'll wonder why you ever bothered to buy them when they're so easy to make yourself!
 

NO JUNK MUESLI BARS(Makes 8 bars)

                   You'll need:
                   1/2 cup dried dates
                   3 overripe bananas
                   3 cups rolled oats
                   1/4 cup ground flax seeds
                   1 teaspoons vanilla essence
                   1 teaspoon cinnamon

                      
                   Optional: 2 Tablespoons extra dried fruit, any other flavour you like:         
                   raisins, craisins, inca berries.

Place the dates in a food processor and pulse a few times until broken into small pieces.
Add the remaining ingredients and pulse until the mixture comes together and the oats are slightly broken down but not completely turned into mooch! ;-)
Press the mixture evenly into a 20cm square baking tin, either lined or silicone base.
Bake in a preheated 180°C oven for 25 mins until golden brown. 

Once cooled, remove from the baking tin & slice into 8 pieces.


Wednesday, July 29, 2015

Chocolate Okara Pie

For those of you who make your own motherless milk, it can often be quite a dilemma what to do with all the leftover pulp. It seems wasteful to throw it away, and yet it isn't always the easiest thing to find uses for, especially if you go through a lot of milk in your home.
Here's a great way to use up some of that pulp.
I have only tried this pie with okara (soy milk pulp) but I see no reason why it wouldn't work with other plant-based milk pulps.

Chocolate Okara Pie

Crust:
1 cup oat flour/bran
1/2 cup okara
1/2 cup applesauce
1 teaspoon baking powder

Put all ingredients in a food processor and pulse a few times until combined. Mixture will be a wet crumble. 
Press into a 20cm pie dish, making sure to press some of the mixture up onto the sides.
Bake for 12-15 minutes in a preheated 180C oven.


Pie filling:
1/2 cup okara
1 cup motherless milk of choice
1/4 cup cocoa powder
1/4 cup coconut sugar (or other dry sweetener of choice)
1/4 cup cornflour
2 teaspoons vanilla

Combine all the pie filling ingredients in a food processor or blender and mix until smooth.
Pour mixture over the baked pie crust.
Cook at 160C for 1 hour. Remove from oven.
The mixture will be slightly wobbly.
Allow to cool prior to slicing.
The mixture will thicken upon cooling.

Serve with frozen berries of choice.


Question of the day:
Do you make your own plant-based milk? If so, what do you do with the pulp?

Thursday, July 23, 2015

"Sausage-less" Rolls

Life has been very busy for me lately - this is reflected in my lack of posts! 
I hope to be more motivated soon and share all the drafts that I have lined up waiting to be published. 

These "sausage" rolls were inspiration enough to get me started back at it again. They are super easy to make and they are very delicious. 

"SAUSAGE-LESS" ROLLS

To make 4 rolls you'll need:
2 tins lentils
1 Tablespoon each: nutritional yeast, onion flakes, soy sauce
1/2 teaspoon each: ground garlic, sage powder, liquid smoke and molasses
8 sheets filo pastry

Drain the lentils and combine them in a bowl with all the other ingredients except for the pastry.
Mash until the lentils have crumbled and the mixture resembles mince. 
Place a quarter of the mixture onto the side-middle of 2 sheets of filo pastry. 
Fold the side of the filo pastry in, then fold the edges up and roll until you reach the end of the pastry.
Repeat for the other 3 rolls.
Place on a lined baking tray and brush the tops with soymilk.
Bake in a 180C oven for 20 minutes until golden brown.


Best served while still hot from the oven.


Sunday, June 21, 2015

Potato-topped, white bean pie

I'm sorry, there simply is no way to photograph this and make it look pretty....
Then again, often the sloppy-messy dinners are the most delicious!

We definitely think this is one of those dinners!!! :-)
This eventuated when a lentil shepherd's pie was on the cards, but no tins of lentils were in the pantry. Alas, potato-topped white bean pie came about :-)
I haven't given this recipe the usual make, try, try again process. However, it's quite a simple dish that is versatile and you basically can't go wrong!


POTATO-TOPPED WHITE BEAN PIE

You'll need:
1 onion

3 cloves garlic
2 stalks celery
1 zucchini
2 carrots
1 green capsicum
120g fresh spinach leaves
2 tins white beans
1/2 large jar of tomato passata
1 Tablespoon mixed Italian herbs

For the potato topping:
6 medium sized potatoes
1/2 cup motherless milk of choice
2 Tablespoons nutritional yeast
1/2 Tablespoon dried onion flakes
1 teaspoon dried chives

Chop the potatoes into little pieces and place in a microwave safe dish and cover with water. Heat in the microwave for 10 minutes (or until totally soft).
Combine all the vegetables except for the spinach in a food processor and pulse a few times until desired size. 

Put chopped veggies into a frying pan and dry-fry until then begin to soften.
Add the drained white beans, the passata, spinach and herbs.
Stir frequently until warmed through and spinach has wilted.
Transfer to a large lasagne size baking dish and press down evenly.

Drain the potatoes and mash with the other ingredients needed for the topping.
Spread the potatoes over the top of the bean/veggie mix.

Place in a preheated 180C oven for 30minutes until lightly browned on top.
Serve :-)

Tuesday, June 2, 2015

Cheesy Baked Cauli & Capsicum

I am totally in love with these mini capsicums that are readily available in the grocery store lately.
There's something about the mixture of the colours and their little cone shapes that I just find incredibly appealing!

Here's our families favourite way of using them lately. This makes a great side dish. 
The capsicums make little cups that hold the cheese sauce - just delicious :-)

CHEESY BAKED CAULI & CAPSICUM

You'll need:
250g tub of mini capsicums
1/2 head cauliflower
1/4 cup nutritional yeast 
1 Tablespoon cornflour
2 teaspoons onion flakes
1/2 teaspoon each sage, garlic powder, paprika
1/2 cup motherless milk of choice
1/4 cup water

Half the capsicums and scrape out the seeds. Place in a baking dish along with the cauliflower broken into florets. 

In a microwavable measuring jug, combine the remaining ingredients and stir with a fork until dissolved. 
Microwave for 1 minute until the mixture starts to thicken.

Pour over the vegetables.

Place in a preheated 200C oven for 40 minutes until veggies have softened and lightly browned.


The top will be crisp and underneath will be filled with oozing-gooey-cheesy sauce :-)


Question of the day:
Are mini capsicums available in your area?
Do you use them as mini scoops for anything?

Wednesday, April 8, 2015

In My Kitchen - April

For those of you who follow my blog, you may have noticed I have taken a bit of a break lately.
We have lots going on for us so I just needed some down time, and that meant time away from the computer.
I have plenty of recipes lined up to share in the coming weeks, but to get back into things I thought it would be a good idea to share what has been happening In My Kitchen so far this year. 


When life gets busy we find that we fall back onto easy meals. Well, to be perfectly honest the large majority of what we eat is easy, basic meals. But in busy times that means relying on some family favourites.
From Top left:
Red Lentil and Spinach Sauce with roasted potatoes and green beans, Veggie Pizza, mashed potatoes with steamed veggies and thick Mushroom Gravy with spinach added, Salad with Potato Waffles and Lentil Burgers, Red Lentil and Spinach Loaf with corn and potatoes, Rice & Veggie Bake, Eggplant Bean Sauce over roasted potatoes with corn, Lentil Meatballs with potatoes in tomato sauce and steamed veggies. 

Easy doesn't mean that dessert is forgotten! 
We often have banana ice-cream, or mini "puddings" that are made with just fruit, dates, applesauce and oats. I often throw together things like this without following a recipe. However when I made these raisin sweetened brownies my family gave me strict instructions to write down exactly what I had done and make them again and again! Recipe coming soon so stay tuned!

Below is a new family favourite that we are working out how to tweak it to be just right. The problem is, I have been slack with writing down exactly what I do, so no 2 batches ever end up the same!
But this is so good that my husband has made up a little song to go with it!
 
I love seeing all the colours as we are cooking our meals :-)
They are just so inviting!


I have been putting our pressure cooker to good use and making large batches of legumes. 
Sometimes though...... it all goes horribly wrong! 
I find that I am still getting used to the exact number of 'minutes' that I should set the cooker to, in order to get perfect legumes. This batch of fava beans that I put on were clearly overdone and they had completely crumbled into a big blob! So instead of being able to use them in a ratatouille like I had planned, I ended up doing some experimenting! I must admit that it brings me much joy to just experiment in my kitchen and not have to bother with precise measurements!
I made several dips and a batch of mini pita breads to go with them. I took this into work for a meeting and everyone really loved both the dip and the pita bread.
These stuffed foldovers were loved by my family too. They were filled with the gone-wrong fava beans, spinach, carrots, peas and corn. Of course, baked til golden brown (not shown).


Talking about baking, there is rarely a week that goes past without our oven producing wonderful aromas.
We made these animal cookies for a "vegan teddy bears picnic" we went to. They had a wonderful texture, quite true to 'cookies' even without the use of vegan butter replacements. I intend to master this creation and blog the recipe soon. However, since they do contain nuts, it is a rare occasion that we eat nuts at home so it may be a while before a final recipe eventuates! 
The "kale" cake shown is the recipe from the new Prevent and Reverse Heart Disease Cookbook, which I finally caved in and purchased! 
Also shown below is a pile of super yummy oat pancakes which we devoured for breakfast one morning. And one of my daughter's favourite after school snacks recently - apple nachos. Sliced apples, piled with goji berries, homemade chocolate sauce, coconut and a sprinkling of walnuts. 

Here's a glimpse of a few of her lunches lately:
More colourful items. She is really enjoying hommus and salad wraps/rolls at the moment. Pictured is also pita bread, banana loaf, fruit wrap and strawberries.  


I bought a new gadget recently - an air-fryer! I am in love with it! Not only does it NOT totally heat the whole house up (like the oven does) but it cooks my potato chips in less than half the time. It is also great for warming up leftovers for school lunchboxes and also makes wonderful crumbed mushrooms (even if the photo looks wrong, I promise you they were delicious! I used oyster mushrooms on this occasion).

Other new items in our kitchen:
PB2 (Powdered Peanut Butter)- Yes, yes I know - processed food! But alas, I just HAD to try this when I saw it in our health food store recently. And with much less fat than peanut butter it ticks the box for an occasional treat.
I bought these curry paste's to try and they are the only oil-free ones I could find. I have only opened the red one so far and it was HOT HOT HOT! So the other three-quarters of the container is still in the fridge!
These relatively new "flats" - available in Woolies and other stores, are made from veggies or fruit with the addition of seeds and/or nuts. They are dehydrated to become crispy. They are quite tasty. Again, not something I would purchase regularly but none the less a great product for when those occasions happen that we need something to snack on and are caught out unprepared (I'm thinking those days when you end up caught back at work for 2 hours!).

Also shown are these White Corn Tortillas. I pictured these because I have been asked about wraps that are oil-free. These are the only ones that I have had any luck being able to find regularly. To be honest, they don't fold real well and are best used in cooked items such as Mexican Pie.

And to finish off this post - here a few items "out" of my kitchen.
Enjoying a delicious Bean & Potato Salad under the Harbour Bridge just before day-light saving ended.

And an amazing oil-free vegan pizza that was made especially for me at a friends birthday party! I felt so blessed! :-)
It's nice to stop and enjoy the little blessings when life gets busy and the weight of everyday things are getting us down!

Question of the day:
What is something that you can stop and be thankful for lately?

Tell us what's been going on in your kitchen this month! And don't forget to add your link at Fig Jam & Lime Cordial. Thanks for hosting Celia! :-)