Friday, November 28, 2014

Kids Lunchbox Club - Salted Bean Snack


My daughter's latest obsession for morning tea break:
SALTED BEAN SNACK

It seems that she just can't get enough of these lately! 
I'm just glad that she is enjoying healthy food so much!
She calls these "green chips" - far better option than 'chips' if you ask me!

Simply top and tail a large handful of beans, place them in a microwave safe dish with just enough water to cover them. 1-2 minutes in the microwave depending on how crisp you like them to be.
Drain, place in a cool coffee mug (the kids will love that!) and crack some sea salt over the top!


Sometimes simple things really are the most satisfying!

What's something really simple that you enjoy eating?

Friday, November 14, 2014

Broccoli Bolognese

The inspiration for this recipe came when out for dinner in an Italian restaurant one time my husband was eating his veggie spaghetti and I looked over and couldn't get over how much the head of the broccoli sitting there looked like ground mince! I wondered if I could turn broccoli into bolognese!
I am pleased to say that yes, indeed it really does work out, and it strangely does look similar to mince bolognese! Add some familiar flavours and you'll definitely have a very satisfying bolognese even without mince! We love this meal & have it frequently - especially when broccoli is $1.99/kg!


BROCCOLI BOLOGNESE
Serves 6
You'll need:
2 medium onions
4 garlic cloves
1 kg broccoli
1 teaspoon "beef" style stock powder (I use Massel)
1 Tablespoon mixed Italian herbs
700g jar tomato passata
1/2 cup fresh basil leaves

Optional to serve:
Nutritional yeast
basil leaves

Chop the onion and crush the garlic.
Dry fry together on a heated frying pan. Sprinkle over the stock powder. Cook until onion is translucent. 
Chop the broccoli as finely as possible, creating little crumbs with the broccoli head. You can add the stems if you would like to, or omit them.
Add the broccoli to the pan along with 1(ish) cup of water and cook until the broccoli is tender and most of the water is absorbed.
Stir through the passata and herbs. Tear the basil leaves and add them too. 
Bring the heat down to low and continue to cook - stirring frequently until the passata is warmed through.
Serve over pasta or potatoes, and with nutritional yeast and extra basil leaves if desired. 


Submitted for Healthy Vegan Fridays.

Add your recipe at:
Rock My Vegan Socks 
Vegan Dollhouse

Friday, November 7, 2014

Chocolate Berry "Cheesecake"

Does a recipe like this really need an introduction?!?
I think not, just try it - you'll want it every night.
It's quick, easy, healthy & delicious.


CHOCOLATE BERRY CHEESECAKE
Crust:
1 cup oats
1 cup dates
1 Tablespoon cocoa powder

Filling:
300g frozen berries of choice
200g medium firm tofu
1/4 cup soymilk (or other motherless milk of choice)
3 Tablespoons maple syrup
3 Tablespoons cocoa powder

Soak the dates in boiling water til softened. 
Drain and combine the dates, oats and cocoa powder in a blender or food processor.
Blend until well combined but not completely crumbed.
Press into a 20cm pie dish.
Blend the ingredients of the pie filling.
Pour into the pie dish on top of the crust. 
Place in the freezer for 3-4 hours.
Defrost 15-20 minutes prior to serving.

Serve for dessert,    no wait,    actually I think this is healthy enough to be BREAKFAST!  

Or turn it into "Birthday Cake".


Submitted for Healthy Vegan Fridays.

Add your recipe at:
Rock My Vegan Socks 
Vegan Dollhouse

Monday, November 3, 2014

In My Kitchen November: Polenta Crusted Adzuki bean & Vegetable Loaf

This month In My Kitchen I'm sharing a few newish gadgets that bring me much delight, and a recipe I've created using them. 

Let me introduce to you my new Tupperware gadget - 
I debated long & hard about if I should get one of these as they are a little pricey. In the end, I have decided it has been so so worth the money! It is incredibly versatile, works just as well as my electric food processor and yet runs just on my arm strength!!!! ;-) Gotta love anything that is environmentally friendly and helps with jiggly arm syndrome!
It has a great capacity, but at the same time doesn't take up much cupboard space (considerable less space than a traditional food processor). It is incredibly easy to clean and all the attachments store inside the compartment itself.
I use it for so many things, but it especially comes in handy for when I want to add vegetables to dishes where I don't want them to be chunky.


Let me also introduce to you my new electrical gadget - 
I never had much luck with the stove top pressure cooker that I had - so I offloaded it and waited for a good special on an electric one. I was over the moon when Target had a massive homewares clearance and this was less than half price. I quickly informed my husband that it was to be part of my birthday present! Thankfully, he took the hint!!!!
I am REALLY REALLY happy with it's pressure cooking ability. Not only for making legumes from dried instead of relying on canned ones, but also for making soups, stews, as well as cooking rice and other grains.
I LOVE the saute function, as it means I can toss in my onions and garlic and saute them in the same pot before adding other ingredients, saying on washing up. 

The non-stick coating is fantastic meaning I can saute without using oil, and also the insert goes into the dishwasher - a MUST for all our cooking gadgets as I hate washing up!!!!
It is *meant* to be multi-function meaning it can slow cook also, however after several trys with the slow cook feature on maximum length I have been disappointed to find the meal virtually uncooked. So, alas I haven't as yet been able to offload my other slow cooker as I was hoping to with a multi-purpose machine. Though, I find that with this machine I have no real use for a slow cooker as I can pop this on anytime and the keep warm function works amazing. Also everything that I previously would of done in the slow cooker has worked fantastically well being pressure cooked.


And now let me show you a recipe I made using both of these new gadgets:

POLENTA CRUSTED ADZUKI BEAN 
AND VEGETABLE LOAF 

Loaf:
1 onion
3 garlic cloves
1 carrot
1/2 head broccoli
2 celery stalks
1/2 capsicum
2 cups cooked adzuki beans
1 teaspoon each: dried oregano, cumin, turmeric, paprika
1/2 cup tomato paste
Topping:
2 Tablespoons nutritional yeast
1/3 cup polenta
1/3 cup panko breadcrumbs (regular breadcrumbs work fine however I particularly like the added crispiness that panko crumbs provide)


Place all the vegetables roughly chopped into a chopper, or food processor.
Process until all ingredients are finely chopped. (You can do this by hand if you would rather, for the best outcome you need all ingredients very finely chopped.)
In a large bowl, lightly mash the adzuki beans (I used the back of a spoon, depending on how soft your beans are you may need a proper masher) and stir in all the herbs and the tomato paste. 
Add the vegetables to the bowl and stir until well combined.
Press the mixture into a large baking dish (I used a 30cm x 20cm). Press down well.
In a smaller bowl combine the ingredients for the topping/crust. Press the crust over the bean mixture and gently press down. (For a gluten free version replace the breadcrumbs with more polenta.)
Bake in a preheated oven for 35-40minutes until golden brown on top.


Slice and serve.
Delicious with roasted potatoes (as I had but somehow managed to delete the picture)!
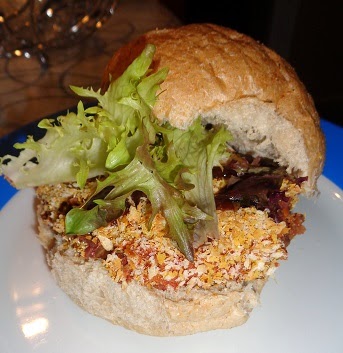
My hubby and daughter love this in a burger!

(Note: I have made this several times and I usually include frozen spinach that has been defrosted prior to adding it to the vegetable mix - however on the occasion I was taking pictures I defrosted the spinach and then forgot to stir it in!)


Share what's in your kitchen at Fig Jam and Lime Cordial.

Question of the day:
Have you ever debated about purchasing a kitchen gadget and had it work out more valuable than you initially thought?